As you have seen from other posts, my husband is quite handy. If you haven't seen any projects he has done around our place, click on 'hubby projects' on the right side under 'Labels', and you can see just a few. Let's face it, though. There are only so many hours in a day and Kevin spends roughly 12 hours of the day away from home. He can't do every project my crazy brain dreams up. *sigh*
I needed a fix for this closet.
We took the doors off several months ago to keep them from getting broken and to save little fingers from getting smashed.
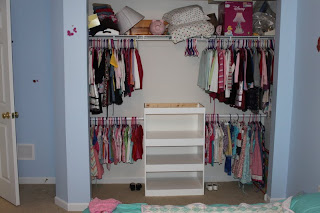
The clothes where up way too high for a 4 yr old and 2 yr old to use. Plus, the clothes (summer and winter) were packed in and hard for me deal with. There needed to be a lower rod and some shelving/drawers of some sort.
My first attempt was a flop. My faceframe split on me and I had trouble getting the joints right. So I took a break.
The kids HAVE to be able to help out around here and that includes being able to put clean clothes away. So I got the bug again a couple of weeks ago. Round 2 went much smoother.
It then fit like a dream in the closet! Now both kids can put clothes away and get dressed all by themselves. A huge help for me and a huge boost in confidence for them. Win - Win!
I secured the shelf to the wall using drywall anchors and screws. The lower rods are left over from a Closetmaid purchase made last year. It's lacking a top, but I'm still trying to decide what I want - painted white or stained wood.
 |
| Close Up |
I'll let you know when I've decide on a top and if I'm going to make drawers or just get baskets for storage.


Love it! we did something similar in the girls closet, but of course I didn't custom make the shelf! we really enjoyed the double level and how the girls could reach their clothes. My dilemma now is that their dresses are getting so long that they are dragging the ground. we may have to go back to a single level at some point, which is a huge space bummer for sure. Do you have a tutorial for adding a fourth dimension to a small bedroom?
ReplyDeleteGo girl!
ReplyDeleteWho needs a man?
You did a fantastic job! I understand getting that itch and wanting to get something done. J usually steps in though, and finishes up my mess;o)
ReplyDeleteI'm so proud of you for trying again and making the shelf unit yourself. It made the closet so much more functional. (and it looks great too!)
ReplyDeleteabsolutely love it!!!
ReplyDelete