Monday, December 16, 2013

Christmas gifts for teachers

I always try to make sure I get the kids' teachers a little something to say Merry Christmas each year. It's  also a good time to say a big 'Thank You' for all the work and time they put into teaching.  We've been blessed to have great teachers who do so much to make sure the kids realized their full potential.  I'm not going to lie, though.  It can get expensive! 4 kids in school and 6 teachers.  Ack!  (can you hear the cha-ching?)

Here is what we are doing this year.
Antibacterial soaps from Bath&Body Works (purchased during a 7 for $20 sale), chocolates and $10 gift cards to Starbucks.  Even if you left out the Starbucks card this is still a great little gift for anyone.

Let's put it all together to make it pretty, as well as useful.
I decided to use a hole punch so the gift cards will be secured to the gift.  I know my kids, and the potential for a card going missing on the way to school is greater than 50/50.  This will take some muscle!  It does help if you wiggle the card side to side as you are trying to punch.
The chocolate goes in to a Christmas-y bag.  (I ended up buying a second bag of chocolates to help fill the Christmas bags rather than just the one bag shown a few pictures earlier.) 
Punch a hole through the bag to be able to secure it with ribbon to the soap pump in a little bit.
I used some red curling ribbon to loop through the gift card.  You could also use an elastic pony tail holder or a rubber band.  The ribbon just seemed to be a better hold for me.
String the ends of your ribbon through the holes in your bag and then secure them around the neck of the soap bottle.  I worked the ribbon up under the cap to make sure it stayed on the bottle all the way to school.  Add a few more strings of ribbon and then use your scissors to curl the ends.

Keep in mind a more neutral sent will be liked by more people.  Let's face it, not everyone wants to smell like a Christmas tree or peppermint all day long.  It's a pretty safe bet, if you stay with a lighter fragrance, the teacher (or anyone else) will like it.

A pretty, useful and yummy present!  I have no worries about these gifts not be used.  Even better, each gift cost about $4.50 (minus the Starbucks card)!

And, yes, the Bath & Body Works bag from the previous facelift post, is what all these hand soaps came home in.  I knew you were wondering.

Wednesday, December 11, 2013

retail bags with a Christmas facelift

Are you like me?  You save all those paper bags from retail stores thinking surly they can be used for something.
You know, bags like these.

Friday, December 6, 2013

gone crunchy

Sort of....

We've been making some changes in our lives - mainly in our eating habits and exercise.  Now, don't misunderstand me.  I have yet to banish chocolate, sweets and carbs from our pantry.  I would have an all out mutiny on my hands if I did that.  There are so many alternatives out there these days, though,  we decided, 'Why not choose better food and living for our family?'.  And, take baby steps to get it done.  Main meals aren't really hard for me to prepare.  {I'll share more on that as time goes on.}  It's the snacks and cravings that really trip me up.  Who doesn't like a few (dozen) Oreo cookies and a tall glass of milk?!  Unfortunately, a paleo diet doesn't include this favorite snack of mine.

Tuesday, December 3, 2013

Thursday, November 21, 2013

snowflakes

We have yet to have any of the white stuff grace our local landscape, but I know before long everything around here will be covered.  It's beautiful, but cold.

{Little secret - I LOVE Christmas, but HATE the cold.  I just have so much trouble keeping warm during this time of year.  Unfortunately, there is a limit to the amount of coffee and hot cocoa a girl can drink.  And I refuse to wear one of these around for 4 to 5 months.  Although, I may not hold out much longer.}

We are staying home this year for Thanksgiving and I'm hoping we'll be able to decorate the house for Christmas as a family during the long weekend.  Now.  I know my kids well.   Within hours of their first day off from school, they will be complaining about being BORED.  I've got to have something in mind to help occupy them without all of them finding solace in an electronic of some sort or pestering each other to the point of tears.  Arts and Crafts are great for them; but, without any direction, my home can quickly look like a paper shredder went on a rampage.  Paper snowflakes could be just the thing!  Allows us all to be creative and we can use the creations as decoration around the house instead of just having an extra bag of trash to the landfill.

Most of us know the basic instructions.  If not, I found this below.
Kinderart.com
While this is great, my older kids need a little more of a challenge.  We'll be taking things to the next level by going 3D.

Twirly Paper Snowflake

Simply Modern Mom
Finnish Paper Star
Craft Ideas
Need a little more of a challenge?  Look at these!

3D Snowflake
Cosmo Cricket
krokotak
Finally - for the nerd in all of us.  (Love this!)

If Its Hip Its Here
I have several others pinned on my Snowflake Board.  Feel free to check them out.  Do you have any favorites?  I'd love to have some other ideas!


Monday, November 18, 2013

christmas is coming

So?  Have you started getting things ready for Christmas?  You know - making lists, shopping, planning menus, putting up the tree, lighting the inside and outside of your home.  Time is quickly ticking away!

I'm not doing too much homemade this year.  I know, I know.  It just doesn't seem to be the year for it, unfortunately.  I do have a couple of projects planned for myself, but nothing huge.  I seem to be in more of a baking mood this year.  (At least, that's the mood right now.)

Larissa has a beautiful felt bookmark she made for a friend at mmmcrafts.  Beautiful!  And it got my gears turning in the direction of Christmas ornaments.  I mean, the possibilities are only limited by your imagination and your Google searching abilities.

BenziDesign has a great selection of colors, sizes and packages.  Renae, the owner, has pre-picked packages, or you can choose your own.  I went the choose your own in the 12x18 size.
I can't wait to get started!  I have so many ideas written down, I won't know where to start when all this wonderful felt arrives.  Fortunately, I have a few days before the felt arrives to find that paper with all my great ideas written on it.  Yep.  Typical me.

Tuesday, October 29, 2013

quick and easy mask

Halloween is only a couple days away.  Are you ready?

I must confess, at this point, I'm usually scrambling around trying to get costumes completed and the candy bought.  This year, at least the costumes are done.  That's the most important part anyway, right?

This year we have a zombie, a vampire-sort-of-thing (this one is still confusing me, but she is happy), a witch, Batgirl and Spiderman.  The costume that has required the most work is Batgirl.  This is a hard one to find on the shelf at the store, so I went into 'I can make that!' mode.  (Nope.  I haven't changed that much over the past year.)

The  Batman symbol was easy.  A Google search brought up this template.  Craft felt and Tacky Spray worked great as my materials. Then I just pinned it on the front of a black shirt. Very easy.
The mask was a little more difficult to figure out.  I wanted something that would stay in place, be easy to see out, and not have to be tied.  Ever tried tying something around a little girl's head and not getting hair tangled in the string?  Close to impossible.

An easy alternative came about while playing with some recently purchased knit headbands.  I believe these were found at Walmart, but I'm sure they can be found at many different stores or online.
So.  Let's get started.

Take your headband and put it on the face/person who will be wearing it.
As you can see above, once the headband is in place, you can trace for the eye holes.  (The white showed this better in a picture than the black.)  On lighter colors you can use a Mark-Be-Gone or similar fabric pen.  I used chalk on the black to outline the eyes.  Remember you are wanting to be able to see out of this mask easily, so make the eye holes a little bigger than the actual eye.
I soon realized the mask fits better if you make an indentation for the bridge of the nose.  Yes, that is sidewalk chalk in the picture above.  I recommend using regular chalkboard chalk, but all of mine seems to have walked off.  All by itself, too, I'm sure.

Next, do a quick zig-zag stitch around the eye area and along the nose.
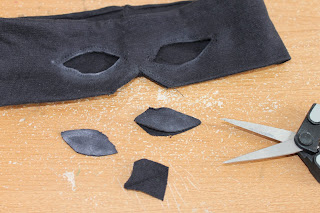
Get your scissors and start cutting the openings open and trim any strings once the stitching is done.

Now, it's ready to try on.
I've had requests from all the other kids for one in their favorite color just for fun.  I think the hardest part was getting my little model to lay still while I traced around her eyes.

Let me know what you think.  Or, if you are able to improve on this, share with us what you did.  I'm sure I'll be making more masks in my future.

LinkWithin

Related Posts with Thumbnails