Showing posts with label free printable. Show all posts

Friday, November 18, 2011

Ladybug Applique Tutorial

Well, I've been able to get a few presents put together and finished.  This bag project took me much longer than expected. {Isn't that always the way it goes, though?}  I'm very pleased with the overall outcome even if it took more time.

You want to know where I got the idea, right?  About 6 or 7 years ago, one of my sisters made a bag for me and my oldest child.  I LOVE this bag!
I get complements every time I take it out.  Unfortunately, I've had a diaper bag slung over my shoulder instead of a purse for the majority of the past 8.5 years.  That will change soon enough, though, my friends.
This is the bag she made for my oldest.
Colorful and fun - just perfect for her!

Here's the secret behind these bags.  They are made out of placemats!  Yep.  Couldn't tell, could ya?  Such an easy project.

Now, I'm not going to give you a tutorial on the bag itself, since there is a perfectly good one right here at JCaroline Creative.  I will give you a short tutorial on how I did the ladybug on the front of one bag.

**Any embellishments will need to be done before sewing the bag together if you will be using the machine.**

What you need:

*Sewing supplies - scissors, thread, sewing machine, iron and ironing board, etc.
*2 Fabric colors (mine were red and black)
*Iron-on adhesive - I used Heat n Bond lite - follow the directions that come with whichever brand you get when ironing
*Ladybug printable pattern {I apologize.  I can't remember how to put it on my website, so you will have to get it off of MediaFire.  It's 11pm and I'm tired.}

1.  Download and print off the ladybug pattern on card stock.

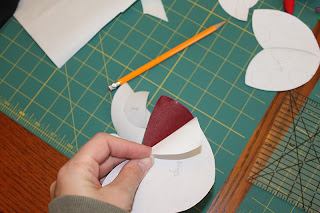
2.  Cut out the pattern pieces and trace them on to the paper side of your iron-on adhesive.

3.  Iron the pieces on to the corresponding fabric colors on the wrong side of the fabric.  Don't worry about cutting out the individual pieces - you will do that in the next step.
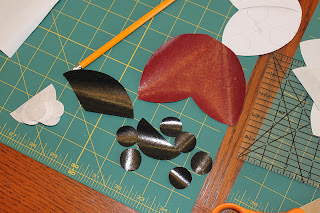
 4.  Cut out each of the pieces of your ladybug.
 5.  Peel the paper backing off the fabric.
 The shiny side will now stick to whatever you are embellishing.
 6.  Do a dry run.  Place all the patten pieces on the front of the bag (shiny side down) making sure to leave room for seams.  Also, take the time now to make a mark down the wings with an air or water soluble marker, if so desired.
 7.  Leaving the head and body pieces in place, remove the wings carefully.  Iron down both the head and body.  Place the wings back on the body and head and iron in place.
 8.  Do a dry run with the spots.  You can always leave the line off and keep all the spots whole.  However, if you choose to have overhang, now is the time to trim the spots before ironing them down. Once you have them the way you like, iron them down.

 9.  Next is the process of satin stitching around all your pieces.  Each machine is different in settings and temperament with this stitch.  I highly recommend using some scrap material to get the setting the way you like - stitch length, stitch width are both factors.  When the stitches look the way you like on the scrap switch over to your project.
Stitch in this order - antenna (starting at the head and moving out), head, body
       all spots - notice I did not stitch all the way around the spots that were trimmed.  You don't want to have a doubled up stitch.
 Lastly, you will stitch down the wings.  Start right behind the head down the center of the wings flowing all the way around.  This will give you one long continuous stitching.

There you have it!  Once you get the hang of it, it goes pretty quickly.  The spots are more of a challenge, but can be done.  This gives such a nice finished look to your project.

Any one, young or 'old' would be please with such a gift!


Tuesday, February 15, 2011

Executive Skills and Routines

Ever heard of executive skills?  You know- task initiation, emotional control, working memory, organization, flexibility, etc.  Of course I had heard of these things, but not all lumped together in a neat little package.  But, once this concept was brought to my attention, it has made a huge difference in our everyday life.  True.

Here's the story and a little insight into our family.....

We (my husband and I), had been struggling for some time with trying to figure out our oldest child.  Not that she is a bad child - we just realized there were some 'issues' that needed to be handled.  Homeschooling didn't work for us.  It just caused friction and turmoil.  Public school was better, but didn't solve everything for us.  Getting her ready and out the door every morning was a chore.  We still had the same struggles doing homework as we had with homeschooling.  She was also bringing home large packets of papers that were suppose to be done in school incomplete.  (Meaning more work for us to get done at home.)

We muddled through the rest of 1st grade and really enjoyed our summer break from all school work.  

It wasn't long after school started this year that our old problems came back to haunt us once again.  If I didn't follow her around the house and remind her what she needed to do next to get ready of a morning, it wouldn't happen.  Some mornings it would take every minute of of our 80 minutes to get ready with all her distractions.  Homework was horrible.  We would literally spend 2 hours on homework every night. (Still do.)  

I could only take about a month of this before something had to be done.  We started having testing/screening done to see what was going on.  Long story short, we discovered a learning disability (which hinders her processing and therefore reading) and possibly ADD (having that re-screened soon).  We also learned that she is a very visual learner and has trouble retaining verbal directions longer than two tasks.

At some point in the middle of all of this, Kevin ran across a book on one of his trips.  

This book, I think, has helped us the most out of all the information we've gained.  It has some practical help and not just theoretical nonsense.  It helped us to really understand that our child had some major hurdles to overcome and not that she was just being disobedient.  And, it gave some humor to what we were going through, which can be in short supply at times.  

If you look at the book on Amazon.com, it has an excerpt to read that will let you see some of what we go through.  If you want to look at the whole book without purchasing, check your local library.

Are things 100% better?  Not even close!  As I sit here and type, we have been on the same question for the past 20 minutes with the complete answer in front of her to copy on her homework.  We have a total of 6 to get through.  *sigh*  Baby steps, people, baby steps.

One thing that has gotten better, is our routine times during the day.  Why?  Because I now know how to teach her in a way that she can learn.  Getting as much of her life into a visual form to help her see what she needs to do has been one of our biggest helps.  It also allows her to become more and more independent.  Going from 80 minutes to get ready for the day down to 25 or 30 is HUGE!

So.  All of this, to share these with you.

Morning Routine 

 Bedtime Routine

 After School Routine

Cover Cards

Good Job Backing
All of these are free for anyone who would like them.  Just please do not try to sell these or mass produce them.  I compiled these and spent an unreal amount of time getting them in a printable form in between everyday life, illnesses and interruptions.  (Oh, the interruptions....)  Please feel free to share these with anyone who might need them or link back to this post.  

The main reason I made these is for us.  I couldn't find anything like them anywhere on the internet.  I'm even using these with the little(r) kids, just to get a head start and make my life easier in the long run.  It's working, too!

Okay.  So, to print these off, just click on the image you want and it will open up in a new window, then click on 'File' and then 'Print'.

The smiley backing is to print on the back of all the routine cards before cutting.  (Yep - positive reinforcement!)  If you would like to do the same, just remember to turn your routine paper upside down and then backward.

All of the routines are color coded to help keep the set together.  Probably unnecessary, but it has helped us.  

I also added a cover card for each of the routines incase anyone would like them.

When putting ours together, I used an 18x18 inch piece of poster paper and then divided it as needed.  I also printed the routine cards on card stock and covered them in clear contact paper to help them hold up to the everyday wear and tear.  To attach them to the poster, I used Command Hangers to allow them to be turned over when that part of the routine is completed.

Here's what it looks like.


I put another Command Hook on the wall beside the the poster to hang the other Routines when not in use.

I really do hope this helps someone out there.  I know it would have been nice for us to have found something like this months ago.  We could have just gotten started on putting our daily routines into longterm memory so much earlier.

More Routine Cards may be coming as time goes by.  If they do, I'll be sure and share them.  If anyone has any questions or further ideas, please feel free to share them with me.


LinkWithin

Related Posts with Thumbnails