Monday, May 23, 2011

Out of the Norm

This weekend was packed.  Even with Kevin having Friday off, it still went by much too quickly.  Graduation parties have started, end of school year activities are continuously going and several (extra) commitments with our church group are keeping us busy.

We did take a little time to squeeze in a date Saturday night, though.  We had a good time, met some new people and heard a little music - all courtesy of Kevin's employer. They aren't the best quality (since I didn't want to lug the monster Canon around), but they are pictures.  :)

Meeting The Band Perry

Luke Bryan

Tim McGraw
I've been a little too busy with life lately to have much crafting time.  But, life is good. :)

Friday, May 20, 2011

Total Randomness

On wish list:
wool felt
Latest project:

For the kids:

Most recent predicament:

Family pictures:


Mother's Day:


 From oven to freezer:

Hubby project:

Something red (almost):

Greens in the garden and on the table:
Lettuce
Spinach

Monday, May 16, 2011

Hawaiian Theme Birthday Party: Party Favors

What's a birthday party without some party favors?  Of course, we had to have to obligatory lei for all the party goers; but, we also wanted to have a couple other fun things for the girls.
 Flower hair clips.

These are easy enough to make.  Just do a search for 'flower hair clips' and all kinds of tutorials will pop up for you.  (I was all out of E6000, but wish I had used that instead of the hot glue gun.)  I found my flowers at Wal-mart.

Flower Tote.

I found these in the Dollar Section at Target.  They have an outside pocket plus a zippered top.  I don't believe I could have made them for the price we paid, so it was a good find!

'Grass' skirts.  These are done pretty much like the 'grass hut' decorations I did.

What you will need:

Paper grocery bag
Rotary Cutter
Rotary Mat
Rotary Ruler
Scissors
String
Packaging Tape

Start by cutting the bottom off your paper bag.


Next, lay your bag out flat.
Now.... Do you see that crease in your paper bag toward the original bottom?  This is your stopping line when cutting.
Line up your ruler and start cutting.  I cut these every 1/2 inch as well.  

Remember to apply enough pressure to cut through both layers of paper.  Check as you are going to avoid having to use the scissors.
After all your cuts have been made, cut the bag open so it is now one layer.

Your next step is to make the waist.  To do this, lay the skirt out flat and then fold the top down to your line or just a little bit above it.

Cut a length of string to put in the casing you just made.  Leave some length on it so you have enough to tie.  Pick a place in the middle to tape the string down so it can't be pulled through.  ({ahem} Experience.)


Now, just tape the folded edge down.  It would be even better to have the skirts be a double layer to make them more full.  Also, scrunch the skirts to get them to look a bit more natural (ha!).  The kids loved wearing these and had a blast running around outside and playing in them.


Wednesday, May 11, 2011

Hawaiian Theme Birthday Party: Decorations Part 2

After having the 'grass hut' look accomplished, we needed to add a little color.  Along with colorful plates, napkins and table clothes, I made these to hang around the room.


So EASY!  I just happened to find the idea one day on Disney's Family Fun site.  All you need are some paper plates and a stapler.  (I used dessert size plates for these.)

I also had a pineapple out.  Very original, right?  But, it did add to the atmosphere and it was very yummy to eat afterward.  

I had really wanted to make a couple of palm trees for the party, too.  Since rain was in the forecast, I didn't want to spend all the time and effort on them and then have them ruined.  Here's a cool tutorial for palm trees.  Of course, there was no rain that day, so my concerns were pointless.  Maybe I'll get a chance to make them one of these days for something else.

Tuesday, May 10, 2011

Hawaiian Theme Birthday Party: Decorations Part 1

The decorations for the party were very easy and inexpensive AND I got to be a little crafty.  This all adds up to fun for me.

First off, the we needed to get a little 'grass hut roof' look going.

We've been hanging on to paper bags from the grocery store for who knows how long.  I was about to throw them all out and declutter a little when I got an idea.

What you need:

Paper bags (grocery size)
rotary cutter
rotary mat
rotary ruler
scissors

First, use your scissors to cut the bottom off the paper bag.

After you have that done, lay the bag out flat on your rotary mat.  (You know- get those little sides that are folded in, folded out.)

Fold the bag in half with the top meeting the bottom.
Now, line the bag up with some lines on your mat and start cutting.  I decided to cut every 1/2 inch.  You could definitely go smaller than this, but it's completely up to you.

Here are some tips:  It's also easier if you start on the left side and move right while cutting (if you are right handed).  A good guide for the cutting to stop is the crease line just a couple of inches from the folded edge of the bag.  (See it in the picture above?)  Also, make sure you push down hard enough to cut all 4 layers of the bag with your rotary cutter.  If not, you'll have to go back with scissors.
After you have all your cuts, lay your bag out flat.
Cut along the fold you have right down the middle.  I also cut one end open to cover twice as much area.

Now all you have to do is hang them up around your party area.

Tuesday, May 3, 2011

Tornado Relief Effort

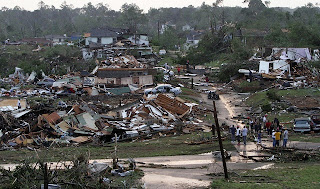
I'm sure many of you have heard about the tornados that changed the lives of many of our Southern neighbors the night of April 27th.  Doing a simple search on Google and the images will amaze you with what Mother Nature can do in just a matter of minutes.
Tornado Aftermath
A close friend is working here in the Metro Saint Louis area gathering donations to help relieve some of the burden of those hit by the tornados.   She's an Auburn Alum and is now the Saint Louis coordinator for Toomer's for Tuscaloosa.

Just a few of the things needed: diapers, wipes, formula, non-perishables, paper goods, water, blankets/pillows, shampoo, soap, towels, razors, toothbrushes, combs/brushes, toothpaste, deodorant, batteries, flashlights and first aid kits.


Close to home - my 2 oldest have set up donation areas in both of their classrooms (thanks to the help of their wonderful teachers), we are receiving donations in our home from friends and neighbors and several friends at church are getting involved as well.
What we've received so far
If you check out Toomer's for Tuscaloosa, you will see all the great work so many people are doing!  Donation sites have been set up in so many places.  Find one near you!

Would you like to help?  If you are in St. Louis, get in touch with me and I'll get you some more specific information where you can make a donation.  If you are outside the St. Louis area, look for somewhere local to make donations.  Are you too far away?  You can always make donations to the American Red Cross Disaster Relief.

Just imagine having to go through this.  Where do you get food for your children?  How do you get a change of clothes to replace the ones you've been wearing for the past 3 days?  What happens when you run out of formula or diapers for your infant/toddler?  How nice would it be to have a clean toothbrush?  All these little things that we all take for granted on a daily basis.

Pass the word on!  Repost this, if you like or link back to this post to get the word out.  Scroll down and share this post on Facebook.  Every little bit counts and helps so many!

Hawaiian Theme Birthday Party: The Cake

Ah, the cake.  As I was getting ready to work on this, I think I figured out that the last time I decorated a cake was about 4 years ago.  Some things that became very apparent to me: 
1. That's way too long between cakes
2.  Marshmallow fondant is VERY sticky
3.  Having 'help' isn't always helpful
I was able to muddle my way through it all and still got a huge thumbs up from the birthday girl.  First thing was to make a colorful cake on the inside.  How to do this?  Just figure out how many colors you want, divide the cake batter into that many containers, color each bowl and then put all the colors into your cake pan.  The batter is thick enough to keep from running together and will bake up just fine.
Colored cake batter and some of my 'help'
 This is a picture of the cake pre-baked.
 This is a picture of the inside after baking and leveling.

Decorating the cake really didn't take that long.  The hardest part was figuring out exactly what I wanted to do.  (Too many ideas warring in my mind.)  

Even though the fondant didn't work for me, (or rather, I wasn't able to manipulate it like I wanted) I decided to go to plan 'B'.  So, I baked a cupcake (red of course), inverted it, cut a notch out of one side and then covered it with buttercream.
 Close up.
The 'sand' was made from crushing Nilla Wafers and then sifting out the large particles.  Very simple.  I wasn't too worried about smoothing out the buttercream all over the cake.  At 2:30 AM I was past being a perfectionist.

I did have fun doing the cake and learned a lot.  I learned that I need a grass tip if I ever decide to do grass again.  I learned that I really do like decorating cakes.  I learned I need to make more icing so I have extra and not just enough.  I learned that I still detest doing the crumb coat and also icing corners (just can't seem to get those right).  I learned that I need to decorate cakes more often and play around with it more when there isn't so much pressure - maybe take another class or two (last one was 6 years ago).  Guess making more cakes will help me keep some weight on, but that probably isn't the best way to do that.  Also, Cake Central is a great resource for all your cake decorating questions and curiosities.

So.  Do any of you decorate your cakes or do you just do like I should have and purchase them?  I might find a new resource in all of you for the next time I go to decorate a cake.

Monday, May 2, 2011

Hawaiian Theme Birthday Party

We had quite the birthday bash over the weekend.  I'm sure you could see from the previous posts that I was a bit stressed trying to get it all done in time.  I didn't get much sleep Friday night, but I did get it all done in time.  (Kevin even ran in a 5K Saturday morning, and I was still able to do it!)

So, this week I'll be sharing some of the things I did for the party.

Party Favors

I did have a lot of fun doing all these little things for the party and hanging out with some AMAZING young ladies.  I also am glad it's all over, because I'm still exhausted.  :)


LinkWithin

Related Posts with Thumbnails