Showing posts with label gifts. Show all posts

Monday, December 16, 2013

Christmas gifts for teachers

I always try to make sure I get the kids' teachers a little something to say Merry Christmas each year. It's  also a good time to say a big 'Thank You' for all the work and time they put into teaching.  We've been blessed to have great teachers who do so much to make sure the kids realized their full potential.  I'm not going to lie, though.  It can get expensive! 4 kids in school and 6 teachers.  Ack!  (can you hear the cha-ching?)

Here is what we are doing this year.
Antibacterial soaps from Bath&Body Works (purchased during a 7 for $20 sale), chocolates and $10 gift cards to Starbucks.  Even if you left out the Starbucks card this is still a great little gift for anyone.

Let's put it all together to make it pretty, as well as useful.
I decided to use a hole punch so the gift cards will be secured to the gift.  I know my kids, and the potential for a card going missing on the way to school is greater than 50/50.  This will take some muscle!  It does help if you wiggle the card side to side as you are trying to punch.
The chocolate goes in to a Christmas-y bag.  (I ended up buying a second bag of chocolates to help fill the Christmas bags rather than just the one bag shown a few pictures earlier.) 
Punch a hole through the bag to be able to secure it with ribbon to the soap pump in a little bit.
I used some red curling ribbon to loop through the gift card.  You could also use an elastic pony tail holder or a rubber band.  The ribbon just seemed to be a better hold for me.
String the ends of your ribbon through the holes in your bag and then secure them around the neck of the soap bottle.  I worked the ribbon up under the cap to make sure it stayed on the bottle all the way to school.  Add a few more strings of ribbon and then use your scissors to curl the ends.

Keep in mind a more neutral sent will be liked by more people.  Let's face it, not everyone wants to smell like a Christmas tree or peppermint all day long.  It's a pretty safe bet, if you stay with a lighter fragrance, the teacher (or anyone else) will like it.

A pretty, useful and yummy present!  I have no worries about these gifts not be used.  Even better, each gift cost about $4.50 (minus the Starbucks card)!

And, yes, the Bath & Body Works bag from the previous facelift post, is what all these hand soaps came home in.  I knew you were wondering.

Monday, January 30, 2012

Kids Kitchen Tower

Most of you know I have a love for all things DIY - even doing some woodworking here and there.  It's just so much fun to make something out of nothing.  The addition of the power tools just pushes it to the next level for me.

I guess the 'nut doesn't fall too far from the tree'.  Since my father retired a few years ago, he has been able to get a shop area set up in their basement.  And, now that he has the time, he has been making a few things for my family and my siblings' families.

One of the projects he did for all of us was a tower for the kids to help in the kitchen.

 My kids love being able to have turns in the kitchen helping me cook.
 Or just being able to play in it pretending it is a spaceship or just a quiet place to go and look at books.
 It adjust to fit all my kids from the 8 yr old all the way down to the almost 2 yr old.  Giving each of them just the right amount of boost.
It's been a great addition and it's even better that my dad took the time and care to make it for us.  He even adjusted my older sister's to be a little wider to accommodate her two sets of twins.

If you would like one, Ana White has plans for a very similar one called 'The Little Helper Tower'.

Thursday, December 15, 2011

Gift Ideas: For Baby

There are all kinds of cute little gifts out there for babies.  I thought I would share a couple of the gifts I'll be giving this year to the new little ones in our family.

First, is a really cute and super easy self binding blanket I found at Megan Poulton Designs.
These blankets were done in flannel and are actually for baby dolls.  I did the inside fabric at 16 in x 16 in and the binding fabric 26 in x 26 in.  I know I'll be doing more of these in the future for baby showers and gifts (at the normal size, of course).

Second, would be the Car Seat Canopy I designed.  I believe I've made about 7 of these in the past 6 months.  Very easy and fun to do.  This will keep the baby warm and dry during these cold months ahead.
Another baby gift I'm thinking about making are some Baprons from a tutorial put together by Jessica at Craftiness Is Not Optional.
via Craftiness Is Not Optional
She put together such cute combinations of fabric!  We really don't need bibs around our place much any more, but these are so much cuter than all those bibs in the stores with the cheesy saying on them.  I just don't know if I have time to make all the bias strips.  Hmmmm.

Well, people, we are down to only 10 days 'til Christmas.  Are you ready?

Friday, December 2, 2011

Gift Idea - Tents

Did you ever make tents out of blankets when you were growing up?  My siblings and I did.  All.  The.  Time.  We had some pretty amazing structures made out of card tables, sheets, chairs and clothes pins.  Best of all?  It could be anything we wanted - a castle, a treehouse, a mansion or even a secret cave.  We had so much fun and now have so many memories.

Here are a few tent ideas I've come across to share with you all.

Fire Station Card Table Tent by Utah County Mom


Hoola Hoop Tent by Living With Punks


Kid's Tent/ Reading Nook by Ana White (seriously love this site!)


Use a little imagination and any of the above tutorials can be modified to make a little one's pretend play much more real.  These are all easy to store and easy to move.  Use them indoors during the cold and/or rainy times of the year and then move them outside when nice weather rolls around.

So, how many of you out there built tents as a kid?


Wednesday, November 30, 2011

Gift Idea - Handmade Ornaments

Handmade ornaments are such an easy thing to do.  Have you looked at all the tutorials out there?  Just about anything you could want to do is available.  How about this 3D Paper Snowflake?

Last year my family did the 12 Days of Christmas for my parents.  (Had to get it in before babies 13 and 14 showed up this year.)  Since my kids are the oldest, we did the first few.  Larissa had done a partridge and a pear in one of her posts.  These were such a cute idea, I got the kids working on a set.

They had such a good time!  My oldest (who has the attention span of a fish) almost made her ornament in one sitting.  


Were they perfect? No.  But, the grandparents really appreciated the kids' work and effort, and the kids were so proud of the finished products.

Another Idea...

Make the ornament sentimental.  My husband's aunt made snowmen for all the grandkids out of his grandmother's chenille bedspread.
Such a wonderful addition to our Christmas tree this year!

Other ideas...
3D Star from Sawdust and Paperscraps
Icosahedron Ball from The Quilted Turtle
Beaded Snowflake Star from Bead Jewelry Making
Owl Plushie
Or any number of other ideas  (Just click on a picture to be taken to the original site.)

Any other ideas out there?  Let me know in the comments or on Facebook to share what you know!

Tuesday, November 22, 2011

Gift Idea - Kid's Apron

My kids love helping in the kitchen.  What kid doesn't?  So, my mother sewed up these pretty little aprons for all the girls in the family one spring.  If you look at the picture closely, you can see she even made matching aprons for each of the girls' Bitty Babies.  They were all thrilled!

These are great ideas for being in the kitchen or getting into character when playing 'house', too.  My kids pull them out all the time.  Do a quick Google search for 'kid's apron patterns' and you will have several free patterns from which to choose.  Or, head over to Joann's during one of their sales and get a pattern for $2 or less.

**Patterns used - Simplicity 3802, Simplicity 4286, Simplicity 2626

Friday, November 18, 2011

Ladybug Applique Tutorial

Well, I've been able to get a few presents put together and finished.  This bag project took me much longer than expected. {Isn't that always the way it goes, though?}  I'm very pleased with the overall outcome even if it took more time.

You want to know where I got the idea, right?  About 6 or 7 years ago, one of my sisters made a bag for me and my oldest child.  I LOVE this bag!
I get complements every time I take it out.  Unfortunately, I've had a diaper bag slung over my shoulder instead of a purse for the majority of the past 8.5 years.  That will change soon enough, though, my friends.
This is the bag she made for my oldest.
Colorful and fun - just perfect for her!

Here's the secret behind these bags.  They are made out of placemats!  Yep.  Couldn't tell, could ya?  Such an easy project.

Now, I'm not going to give you a tutorial on the bag itself, since there is a perfectly good one right here at JCaroline Creative.  I will give you a short tutorial on how I did the ladybug on the front of one bag.

**Any embellishments will need to be done before sewing the bag together if you will be using the machine.**

What you need:

*Sewing supplies - scissors, thread, sewing machine, iron and ironing board, etc.
*2 Fabric colors (mine were red and black)
*Iron-on adhesive - I used Heat n Bond lite - follow the directions that come with whichever brand you get when ironing
*Ladybug printable pattern {I apologize.  I can't remember how to put it on my website, so you will have to get it off of MediaFire.  It's 11pm and I'm tired.}

1.  Download and print off the ladybug pattern on card stock.

2.  Cut out the pattern pieces and trace them on to the paper side of your iron-on adhesive.

3.  Iron the pieces on to the corresponding fabric colors on the wrong side of the fabric.  Don't worry about cutting out the individual pieces - you will do that in the next step.
 4.  Cut out each of the pieces of your ladybug.
 5.  Peel the paper backing off the fabric.
 The shiny side will now stick to whatever you are embellishing.
 6.  Do a dry run.  Place all the patten pieces on the front of the bag (shiny side down) making sure to leave room for seams.  Also, take the time now to make a mark down the wings with an air or water soluble marker, if so desired.
 7.  Leaving the head and body pieces in place, remove the wings carefully.  Iron down both the head and body.  Place the wings back on the body and head and iron in place.
 8.  Do a dry run with the spots.  You can always leave the line off and keep all the spots whole.  However, if you choose to have overhang, now is the time to trim the spots before ironing them down. Once you have them the way you like, iron them down.

 9.  Next is the process of satin stitching around all your pieces.  Each machine is different in settings and temperament with this stitch.  I highly recommend using some scrap material to get the setting the way you like - stitch length, stitch width are both factors.  When the stitches look the way you like on the scrap switch over to your project.
Stitch in this order - antenna (starting at the head and moving out), head, body
       all spots - notice I did not stitch all the way around the spots that were trimmed.  You don't want to have a doubled up stitch.
 Lastly, you will stitch down the wings.  Start right behind the head down the center of the wings flowing all the way around.  This will give you one long continuous stitching.

There you have it!  Once you get the hang of it, it goes pretty quickly.  The spots are more of a challenge, but can be done.  This gives such a nice finished look to your project.

Any one, young or 'old' would be please with such a gift!


Wednesday, November 2, 2011

What Now?

Halloween is over and my life is no longer consumed with costumes and candy - well, at least the costumes are out of the picture.
Pirate, Lanie (AG), Cinderella, Dora and Special Forces
The kids had a blast and everyone was pleased with the final costume.  (A huge relief for a stressed out momma.)  The candy haul was extreme this year, too.  We have some of the most wonderful and generous neighbors!  Although, I'm trying to decide if I need to remind the kids or the husband that trash goes in the trash can.  Hmmmm........

So, now I'm on to crafting and sewing whatever I want, right?  Definitely true - to an extent.  I have Christmas on the brain and that makes it hard to think of much else.  'What about Thanksgiving?', you ask?  I really enjoy Thanksgiving, but I don't feel the need to DO anything for that holiday.  Thanksgiving is just a great time of the year in which I know I get to spend a lot of special time with family.  Christmas is family time and stress time.

Now that you all know where my mind is, you know where this blog is headed for the next couple of months.  (Really - 53 days?!)  I've got some new ideas of my own and lots of ideas rounded up from other places I'm hoping to share with you during this time.  {If you are family, don't read this for the next month or so if want to be surprised.}

I've already started.  Here's a sneak peak at one Christmas project/gift idea I'll be sharing with you all very soon.
If you haven't yet, now is a good time to like This Too! on Facebook.  I'll be on there quite a bit adding little snippets and comments (or questions!) as the time goes by.  Feel free to post any of your own links, pictures, questions and comments, too.  Just please keep it craft related and G rated.  Maybe we can help each other make it to the end of the season with our crafts all wrapped and ready to give!


Monday, July 25, 2011

Infant Car Seat Canopy

Here is a copy of the guest post I did for Sawdust and Paperscraps.  I wanted to have a copy here so everyone could find it easily.  Enjoy!

This project all started when I stumbled across the site www.eletent.com while looking for baby gift ideas.  I have this awful, incurable disease that makes me think I can make just about anything I could buy.  This time was no exception.  Here is one of the covers I've been able to make and it really was easy!


What you will need:

Sewing machine
1 ½ yard of  main material (fabric A)
1 ½ yard of contrasting material (fabric B)
Sewable Velcro
Thread
Straight pins
Scissors
Water or air soluble fabric marker
Tape measurer
Straight edge
Embellishments (large buttons, ribbon, fabric for yoyo’s, ect.)

Not necessary, but nice to have:

Rotary mat
Rotary ruler
Rotary cutter
Serger and thread

Let’s get started.

Main Body of Project: 

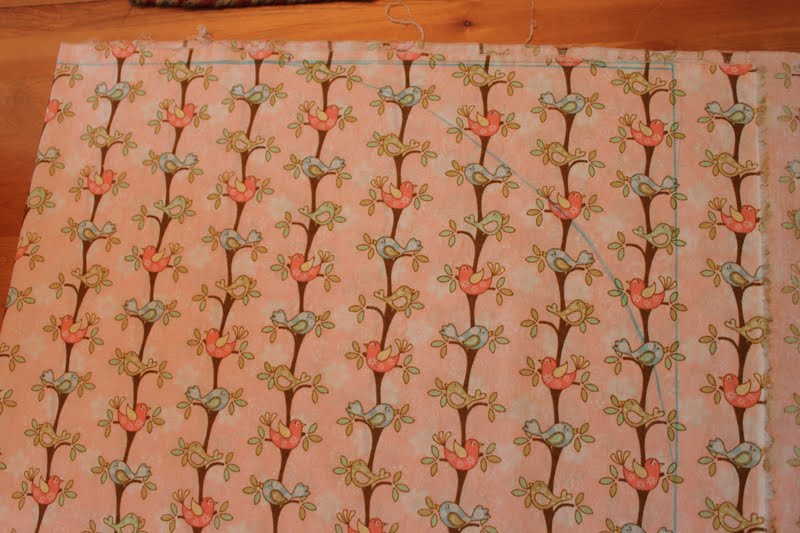
Working with your main fabric (fabric A), first, lay it out in front of you and decide how you want the finished cover to look.  The cover will be roughly 34” wide x 42” long.  Does the material have a distinct pattern to it or does it not matter?  (Mine has a cute bird pattern to it and I wanted to make sure this was running vertical and straight.)

Lay the material wrong side up.  Now fold over one side (the length) 19 inches.  Smooth it all out and make sure it is straight.

At this point, we need to get our rectangle drawn out.  A straight edge is needed for this and a rotary ruler really comes in handy.  Measure 17” from the fold at the top of your material and several points down the length of the fabric making marks with your water/air soluble marker.  The total length will be 42”, so keep making your marks down your fabric until you get there.  Connect the dots once you have all your marks in place and make sure everything is square – top and bottom.

Now to make the rounded corners at the top and bottom. 
At the top, measure from the corner you drew back toward the fold 10” and make a mark.  From the same corner, measure down 10” and make a mark.  You will now free hand a rounded edge between these two marks.

The bottom needs a rounded edge as well.  It’s the same process, just a slight difference in the measurements.  From the bottom corner, measure back toward the fold 10” and make a mark.  Again, from the bottom corner, measure up 14” along the line you made and make a mark.  Now start free handing your curve to connect the marks you just made.

Pin along the lines you’ve drawn on your fabric to keep it from shifting while cutting.  Now cut and you should end up with this.

We’re now going to mark the locations of the straps.
Measure down 18 ½” along the fold and make a mark with your fabric pen.  From this mark, measure over 3” and 5 ½ “ marking each place.  Draw a line connecting these two marks.

Repeat on the other side of the fold.

Okay.  Remember that yard and a half of contrasting fabric (Fabric B)?  Now’s the time to get that out.  Lay it out just like you did the main fabric A:  wrong side up, fold over roughly 19” and smooth out.  We are going to use the piece we already measured and cut from Fabric A as our pattern for cutting Fabric B.  Line up the folds of both fabrics and smooth Fabric A (the pattern piece) over Fabric B.  Pin Fabric A in place.

Now cut.

Unpin everything and separate Fabric A from Fabric B. 
Lay Fabric B out on a flat surface wrong side up.  Lay Fabric A right side up on top of Fabric B making a sort of material sandwich.

Get your pins ready for this next step.  Starting in the center and working your way out to the edges you are going to pin and smooth, pin and smooth, and pin and smooth until you have used up every last pin you own.  (At least it ‘s going to feel like that by the end of this step.)  Ideally, your two pieces of material should match up perfectly.  Do a quick check around the edges just to make sure this is the case.  If not, re-pin in that area or, worst-case scenario, get the scissors out and do a little trimming.  Set this aside for a few minutes.

We are now moving on to the straps that will hold the cover in place on the car seat handle.

From your leftover fabric of both A and B, you will need to cut 2 – 3” x 7 ½” rectangles (giving you a total of 4 rectangles).  This is another time the Rotary tools will come in handy, but you can definitely get by without them.

Place one Fabric A and one Fabric B right sides together and stitch a ¼” seam around it leaving a small opening to turn.  Trim your corners and turn.  After you have turned the strap right side out, topstitch around the edges.  Make sure you close the turn opening as you go.

Next comes the Velcro.  I just eyeballed the length I needed by holding it across the end of each strap and then cutting.   You will need to decide at this point if you want to have the contrasting material showing or if you want the main fabric showing on the straps.  This is just a matter of personal preference.  Once you decide this, the Velcro can be attached to the straps. 

For some reason, having the ‘hook’ side on the top and the ‘loop’ side on the bottom makes more sense to me.  (Fabric A will be showing on mine with Fabric B on the inside.)  Once again there isn’t really a right or wrong on this.  **Do remember, though!  You have to have one on the front and one on the back for the straps to work right.** Play around with it a little and get a feel for how the straps will attach.  That should give you a better idea of how you want it to work.

Now to mark the straps for attaching them to the cover.  Here is a lovely hand drawn diagram to show you where to make your marks.  (Heavy sarcasm, but you get the idea.)

Do this on both front and back of both straps.
The top line on the straps will be your guide for placement on the cover.  Remember those lines we drew on the cover 18 ½” down the middle and 3” over?  Find both of those lines and match up the top line on each strap.  Pin the straps in place making sure they are both straight.  (Wonky straps just won’t do!) 


Now, sew the straps in place.

Finishing:
There are several ways one of these covers can be finished.  I chose to do a rolled hem on mine, but I realize not everyone has a serger available.

Here are a couple of other ideas. 
Use bias tape around the edge.  This will give a very polished look to the cover.  You can make your own or purchase some at a fabric store like Joann’s or Hobby Lobby.  If you choose to make your own, just remember to purchase enough fabric to accomplish this.

Another idea is to sew the cover right-sides-together leaving a hole for turning and then topstitching around the edges.  This would be a change at the beginning of the whole process, so one would have to make the decision early.
Embellishments:
This is always the most fun part of a project for me, and sometimes the most agonizing part as well.  Here are two examples of what I’ve done to give the straps a more finished look.
Fabric circle + fabric yoyo + large button
Simple grosgrain ribbon bow with button
Nothing too complicated, but both add a little something to finish it all off.
Whew!  I think that’s it!
Good luck! And if you have any questions, please feel free to contact me.

LinkWithin

Related Posts with Thumbnails