Sort of....
We've been making some changes in our lives - mainly in our eating habits and exercise. Now, don't misunderstand me. I have yet to banish chocolate, sweets and carbs from our pantry. I would have an all out mutiny on my hands if I did that. There are so many alternatives out there these days, though, we decided, 'Why not choose better food and living for our family?'. And, take baby steps to get it done. Main meals aren't really hard for me to prepare. {I'll share more on that as time goes on.} It's the snacks and cravings that really trip me up. Who doesn't like a few (dozen) Oreo cookies and a tall glass of milk?! Unfortunately, a paleo diet doesn't include this favorite snack of mine.

Showing posts with label quick and easy. Show all posts
Showing posts with label quick and easy. Show all posts
Friday, December 6, 2013


Tuesday, October 29, 2013
quick and easy mask
Halloween is only a couple days away. Are you ready?
I must confess, at this point, I'm usually scrambling around trying to get costumes completed and the candy bought. This year, at least the costumes are done. That's the most important part anyway, right?
This year we have a zombie, a vampire-sort-of-thing (this one is still confusing me, but she is happy), a witch, Batgirl and Spiderman. The costume that has required the most work is Batgirl. This is a hard one to find on the shelf at the store, so I went into 'I can make that!' mode. (Nope. I haven't changed that much over the past year.)
The Batman symbol was easy. A Google search brought up this template. Craft felt and Tacky Spray worked great as my materials. Then I just pinned it on the front of a black shirt. Very easy.
 The mask was a little more difficult to figure out. I wanted something that would stay in place, be easy to see out, and not have to be tied. Ever tried tying something around a little girl's head and not getting hair tangled in the string? Close to impossible.
 So. Let's get started.
Take your headband and put it on the face/person who will be wearing it.
 As you can see above, once the headband is in place, you can trace for the eye holes. (The white showed this better in a picture than the black.) On lighter colors you can use a Mark-Be-Gone or similar fabric pen. I used chalk on the black to outline the eyes. Remember you are wanting to be able to see out of this mask easily, so make the eye holes a little bigger than the actual eye.
 I soon realized the mask fits better if you make an indentation for the bridge of the nose. Yes, that is sidewalk chalk in the picture above. I recommend using regular chalkboard chalk, but all of mine seems to have walked off. All by itself, too, I'm sure.
Next, do a quick zig-zag stitch around the eye area and along the nose.
 Get your scissors and start cutting the openings open and trim any strings once the stitching is done.

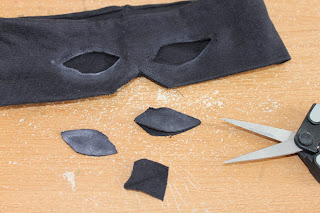 Now, it's ready to try on.
 I've had requests from all the other kids for one in their favorite color just for fun. I think the hardest part was getting my little model to lay still while I traced around her eyes.
Let me know what you think. Or, if you are able to improve on this, share with us what you did. I'm sure I'll be making more masks in my future.
I must confess, at this point, I'm usually scrambling around trying to get costumes completed and the candy bought. This year, at least the costumes are done. That's the most important part anyway, right?
This year we have a zombie, a vampire-sort-of-thing (this one is still confusing me, but she is happy), a witch, Batgirl and Spiderman. The costume that has required the most work is Batgirl. This is a hard one to find on the shelf at the store, so I went into 'I can make that!' mode. (Nope. I haven't changed that much over the past year.)
The Batman symbol was easy. A Google search brought up this template. Craft felt and Tacky Spray worked great as my materials. Then I just pinned it on the front of a black shirt. Very easy.

An easy alternative came about while playing with some recently purchased knit headbands. I believe these were found at Walmart, but I'm sure they can be found at many different stores or online.

Take your headband and put it on the face/person who will be wearing it.


Next, do a quick zig-zag stitch around the eye area and along the nose.


Let me know what you think. Or, if you are able to improve on this, share with us what you did. I'm sure I'll be making more masks in my future.
Monday, September 19, 2011
New Wall Calendars
I seem to be on a never ending (trial and error) mission to get organized. Not too long ago I made a little message board to put next to my wall calendar.

It worked, somewhat, but it really just look horribly cluttered on my wall once it was filled up. Plus, I need to have two months up so I can see easily what is going on in our lives: everyday, school and work trips.
Did I make something? NO! I sold out and headed to the local Wal-mart for these dry erase boards! (Something similar to this.) My craftiness only goes so far, people!

It worked, somewhat, but it really just look horribly cluttered on my wall once it was filled up. Plus, I need to have two months up so I can see easily what is going on in our lives: everyday, school and work trips.
Did I make something? NO! I sold out and headed to the local Wal-mart for these dry erase boards! (Something similar to this.) My craftiness only goes so far, people!
 |
| Click on picture to view larger. Sorry for the glare! |
I also had to figure out a way to rotate the boards. I didn't want to constantly be rewriting on two boards each month. Grabbing some Command Picture Hangers as an impulse purchase, I figured it was worth a try. They work brilliantly! Now, I only have to erase one board a month and can still have them in right to left order (for my poor little anal-retentive mind). I do need to grab some different colored markers so I can have everything color coded. I am DETERMINED that I will not forget about pajama day at school this year!
Wednesday, June 22, 2011
It's the little things
***No kickbacks here, just friendly info. ***
Monday, November 1, 2010
Halloween Recap


The day started off with a couple of the kids being under the weather. I kept the two youngest home from church yesterday morning. And then around 2 o'clock our oldest started running a low grade fever. I wasn't sure what the evening was going to bring, but I knew I didn't want to be lugging a sick and crying child to the door every time the door bell rang. So, at the last minute I made up this sign to put out with the candy on the porch.


I'm thinking I might keep this to use again sometime. One of these days I'm hoping to be able to go out to Trick or Treat too. :)
Everything really worked out well. I kept the baby home with his little runny nose and cough. O, our 4th daughter, wasn't feeling very well and only went out for about 15 min. (She actually asked Daddy to bring her home.) The other kids stuck it out and had a blast! All of our neighbors are so great and the kids really loved getting to see all their friends dressed up.
Daddy even got a cut of the candy for taking them out! (These are actually the full size candy bars that the kids didn't care for in their buckets. :)

Now that Halloween is officially over, I plan to get started on Christmas. It seems crazy, but did you all know that it is only 55 days away?! I have 11 nieces and nephews to think about plus the rest of the family members. I have a good start on some and a long list for the rest, but I'm really hoping to be done with it all by Thanksgiving. Well...... at least I have that as a goal.
Monday, August 16, 2010
Baby Girl Hospital Cap Tutorial
As promised on Friday, here is the tutorial.
All of these hospital caps I've seen have been made with the 'bow' being the same knit material as the cap. Unfortunately, I didn't have a second cap, so I had to improvise. Here's what I did.
What you will need:
Infant knit hospital cap
Baby washcloth
Scissors
Sewing Machine

Okay. Let's get started!
Take your knit cap and determine where you want the center of your bow. Cut two small slits in the folded cuff part of the cap. (Remember you are working with knit. The slits you cut WILL stretch.)

Lay your washcloth out flat.

Now, fold it in thirds like you would a letter to put in an envelope. Fold with right side of washcloth to the inside. (Unlike what the picture shows. Sorry, Folks.)


Line up one edge of your cap with the same edge of the washcloth. Trim the washcloth to the same length (width?) as the cap.

Mosey on over to your trusty sewing machine and make a stitch down both open edges of your washcloth. I used my machines overlock stitch.

See where your opening is? Turn your little rectangle right-side-out through there.

Now you are going to make an accordion folding out of your rectangle. This will help you thread it through the slits and give a little demention to the 'bow' when in.

It's taking shape! Gently work it through the slits in the cap brim. Those little cuts will open up a bit. If you need to open them up more to accommodate the 'bow', go for it - just don't let your scissors get carried away.

Fluff, center and shape your bow now that it's in the cap. I didn't tack the bow to the cap at all. Obviously, if you feel there is a need, do it.

Now all you have to do is wait for that precious little bundle to arrive to become the envy of all those in the hospital nursery.
Linking To


Linking To
Wednesday, February 24, 2010
Telling Time
My oldest daughter is now in public school. That hasn't put me on the teaching sidelines by any means, though. The most recent concept that she has needed help in fully grasping has been the 'quarter-to', 'quarter-past', and 'half-past'. I got tired of constantly having to redraw a clock on the whiteboard or erase the hands on a clock drawn on a piece of paper. So, while she was at school one day, I sat down and made a template to put contact paper over. This allows her to use a dry erase marker over and over on the same page. Now all I have to do is call out whatever time I think up and don't have to help 'reset' the clock while getting supper on the table.

To make it even more appealing to a 6 yr old girl, I trimmed down the edges and put it on a bright pink paper.
If you would like a copy of your own, here is a link to download the pdf. Please only use it for your private use. (I know it's not valuable, but it did take some time to create this!)

To make it even more appealing to a 6 yr old girl, I trimmed down the edges and put it on a bright pink paper.
If you would like a copy of your own, here is a link to download the pdf. Please only use it for your private use. (I know it's not valuable, but it did take some time to create this!)
Friday, February 5, 2010
Wall Art

Sitting on a shelf waiting for me to find hardware.

Close up of one frame.
Easy project for anyone to do!
Monday, February 1, 2010
Begging For More!

Ever serve your kids spinach, carrots and sweet potatoes and have them begging you for more? Me either, until Saturday night. Now, my oldest is a parents dream when it comes to eating veggies. Baby spinach salad with tomatoes, bell peppers, carrots, cucumbers and feta cheese is one of her favorite side dishes. She won't touch a baked potato for anything, though - go figure!
Anyway, the other three leave a bit to be desired in there veggie consumption. But, Saturday was such a special night here. A friend recommended the cookbook Deceptively Delicious by Jessica Seinfeld to me over a year ago. I've even had it on hand for that long and just put off using any of the recipies thinking it wouldn't work on my kids. Boy, was I wrong!
Hubby and I kept stealing glances across the table as each child tried the homemade chicken nuggets smuggeling copious amounts of sweet potatoes into their little bodies. Score one! Dipped in buttermilk ranch made from a can of great northern beans. Score two! And for dessert? Yummy chocolaty brownies filled with spinach and carrots. HOME RUN!!! My kids couldn't get enough of it all.
Next on the list - Another batch of brownies for home and one for Hubby's office, Blueberry muffins with flaxseed meal and yellow squash, and pink pancakes with beets and apples. How scrumptious!
Who knew eating your vegetables could be so good?!
Monday, August 10, 2009
Lazy Days Skirt
This has been done by many people, I know. The tutorial can be found here. I'm very proud of the fact that I was able to get 3 of these skirts done in one day and still managed to get all my other responsibilities done. (You know it's UNBELIEVABLY easy, if that's the case.)

This particular fabric is a St. Jude print. I loved all the happy flowers and wonderfully bright colors. I used gross grain ribbon for the hem. Very easy and such a fun color!

The second fabric is one I picked up somewhere along the way. It's another happy little fabric that the girls all seem to like.
The best part is the happiness that I get to see on the kids faces when I get projects like this finished. A bit selfish, maybe, but a definite win - win situation for all of us.
Subscribe to:
Posts (Atom)
LinkWithin
