Monday, June 27, 2011

Kids' Closet: Part 1

This is just about 1/3 of the way done.  When will it be complete?  I have no idea.  So, instead of waiting to show you the finished project, I thought I would go ahead and get this part up.  I can always post as more parts of it are completed.  Plus, I'm pretty stinkin' excited about it and wanted to share!

As you have seen from other posts, my husband is quite handy.  If you haven't seen any projects he has done around our place, click on 'hubby projects' on the right side under 'Labels', and you can see just a few.  Let's face it, though.  There are only so many hours in a day and Kevin spends roughly 12 hours of the day away from home.  He can't do every project my crazy brain dreams up.  *sigh*

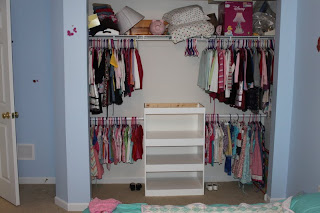
I needed a fix for this closet.
We took the doors off several months ago to keep them from getting broken and to save little fingers from  getting smashed.

The clothes where up way too high for a 4 yr old and 2 yr old to use.  Plus, the clothes (summer and winter) were packed in and hard for me deal with.  There needed to be a lower rod and some shelving/drawers of some sort.

My first attempt was a flop.  My faceframe split on me and I had trouble getting the joints right.  So I took a break.

The kids HAVE to be able to help out around here and that includes being able to put clean clothes away.  So I got the bug again a couple of weeks ago.  Round 2 went much smoother.

I took over a small part of the basement and got to work.  I had the MDF cut from Round 1 and decided to confiscate a couple of 1x2 pine boards from another project.  Once it was all put together, I painted it white.

It then fit like a dream in the closet!  Now both kids can put clothes away and get dressed all by themselves.  A huge help for me and a huge boost in confidence for them.  Win - Win!

I secured the shelf to the wall using drywall anchors and screws.  The lower rods are left over from a Closetmaid purchase made last year.  It's lacking a top, but I'm still trying to decide what I want - painted white or stained wood.
Close Up
Honestly?  I had SO much fun with this!  I'm ready to get Kevin's shop set up in the basement and start busting out some woodworking projects.  (Have you seen www.ana-white.com?)  The table saw is truly intimidating.  I'm sure I would get over it with practice, though.  Also, I'm thrilled I purchased a Kreg Jig over a year ago.  (Just wish I had gotten around to using it sooner.)  It made putting this together quick and easy with no noticeable nail or screw holes to fill.

I'll let you know when I've decide on a top and if I'm going to make drawers or just get baskets for storage.

Friday, June 24, 2011

Spicy BBQ Sauce

I married a renaissance man.  Not only does he build and fix things around the house and help take care of the kids, he can cook too!

He's been on a wing kick lately.  He prefers hot sauce.  We have none - at least none that would work on wings.  Time to kick the BBQ sauce up a notch, or two.

Easy-peasy and oh so good!

Spicy BBQ Sauce 


1/3 C favorite BBQ Sauce
1 T Chalula Hot Sauce

Mix these together in a bowl that has a lid.  Place your wings in the bowl.  Put the lid on the bowl and give it all a good shake.  Place them all on a platter and enjoy!
Obviously, if you like your sauce hotter, add more hot sauce.  Kevin is just being kind to my taste buds.

Wednesday, June 22, 2011

It's the little things

We've had this for a while now.  I just FINALLY took the time to put it up on the rear window of our van. Cute, huh?  If you want your own, you can get it here.  There are lots of options to allow you to customize your decal just for you.

***No kickbacks here, just friendly info. ***

Monday, June 20, 2011

Lamp Revamp

I had some beaded trim left over from my window project.  I couldn't stand so much of it going unused at the price I paid.  (If you are reading this, Kevin, ignore that last sentence.  It was cheap, cheap, CHEAP.)

I decided to add a little to my living room lamp.

Before

After
 The base and shade were both purchased from Wal-mart.  The beaded fringe is from Joann's.  Such a simple project.  Sad to say, I wasn't sure if I was going to like the finished project.  (Typical Me.)  To alleviate my fears of completely ruining the lamp shade, I stitched the fringe around the bottom instead of gluing.  Now with just a snip it can be removed.   I like it, though, so it will be staying.   It was nice to actually knock a project out in one evening this time.

Friday, June 17, 2011

Bragging. Again.

Projects are multiplying and chasing each other around in my little ol' noggin lately.  Unfortunately, there are only so many hours in the day.  AND, I am a mother before being a crafter.  (Ugh.  Priorities!)

So, here's another project sweet hubby was able to finish up and put in our garage.

Yes, there are only four slots for bikes. But, we figure by the time child #5 is riding a bike, child #1 will either not be interested in riding or can just use the kickstand.  (Genius, I know!)

If you would like the information on how to do this, feel free to email me and I'll go get all the measurements for you.

Wednesday, June 15, 2011

Time To Brag

On my husband.

We have been doing some gardening this spring and have really enjoyed it.  When it was raining like crazy earlier in the year, Kevin and I were both talking about how we were going to miss all the rain when summer really set in.  We wanted to get rain barrels, but couldn't get past the price tags.  Very few people (one family) would be seeing them so we didn't need to worry so much about the aesthetic value - just storage.

Gotta love an engineer with a practical side.
We now have three 55 gallon barrels full of rain water.  This sits at the back of our garage, so it's not visible from the front of the house.  (The reason aesthetics are not factored into our equation.)  It all sits a top a level platform built with leftover pressure treated wood from the deck construction.
 The barrels are connected with PVC.
He fitted each barrel with its own valve at the bottom - complete with shut off and quick release hose attachment.

I'm just so proud!  Didn't he do a good job?  And all for less than one of the fancy store bought ones.  Although, I do have this uncontrollable urge to paint them all.

Monday, June 13, 2011

EXPO House Party

We've been super busy around here, but the kids and I did take some time to have some fun with friends. 

Have you heard of HouseParty.com?  I hadn't until I talked with my SIL.  Basically, companies want to promote their products and HouseParty connects these companies with consumers to try out the products.  I decided to apply for the Expo party, and was one of the luck few chosen!

 Everyone who came got a dry erase board, six fine point markers, 3 bullet point markers and an eraser.  All courtesy of Expo.  As hostess I got a bonus of the dry erase easel. :)


The kids had a blast drawing with the bright colored markers on their personal whiteboard.  My kids have been using everything all weekend long.  I even had to search my 4 year old before bed to make sure she didn't sleep with the markers!

If you have a chance, go check out HouseParty.com.  We had a lot of fun with this party and there are all kinds of other parties available for all tastes and interests.  

LinkWithin

Related Posts with Thumbnails